To use the gateway in an inspection, you have to first add it to the Xaap mobile application.
Note: Please make sure that your gateway is connected to the panel before connecting it to the Xaap cloud.
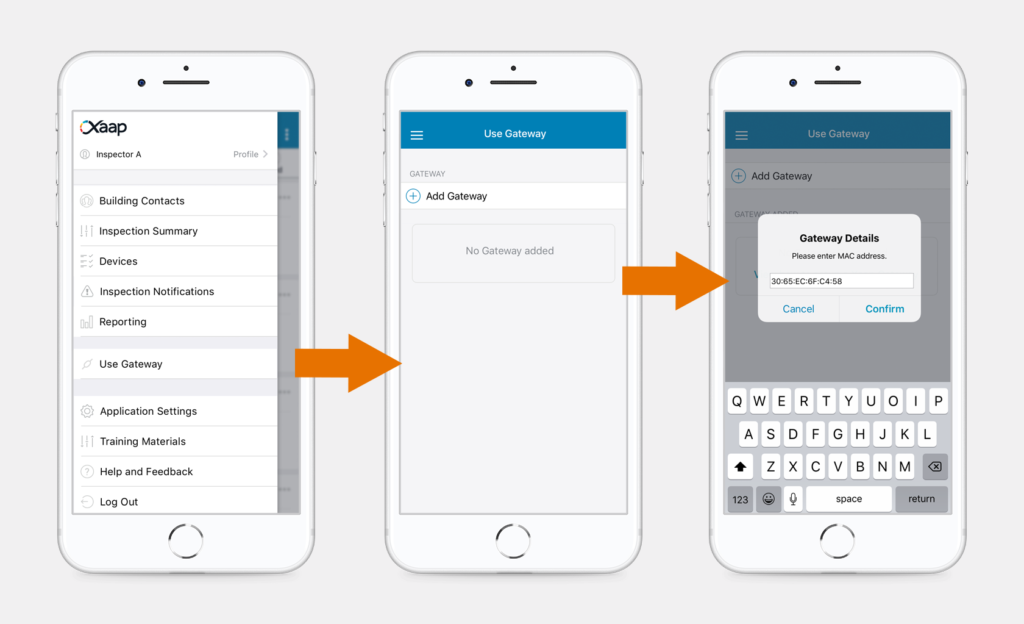
- After you have created your inspection, click the menu icon in the top left corner.
- Select the option ‘Use Gateway’.
- Click the ‘Add Gateway’ button on the next screen and when prompted, type in your gateway’s MAC address. Then, click ‘Confirm’.

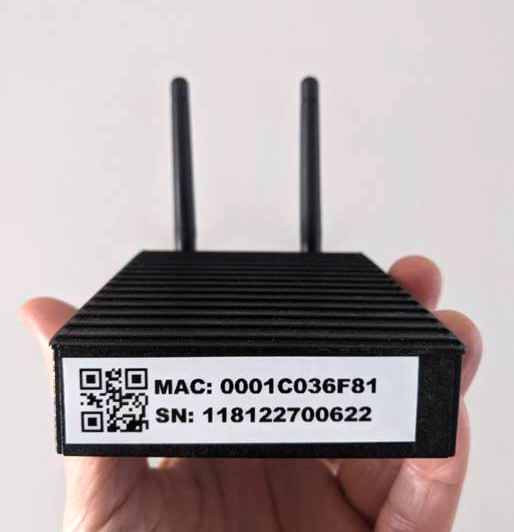
The MAC address can be found on the label on the front of the gateway.

- The gateway will then appear on the list of added gateways. From there, click ‘Use’.
- The next screen will tell you whether your gateway is online or not. If your gateway is offline, click ‘Configure’. From there you can either connect the gateway manually, by entering its SSID and serial number, or automatically, by scanning its QR code.
- If the panel shows up as disconnected, click here for a step by step tutorial of how to connect your gateway to a panel.
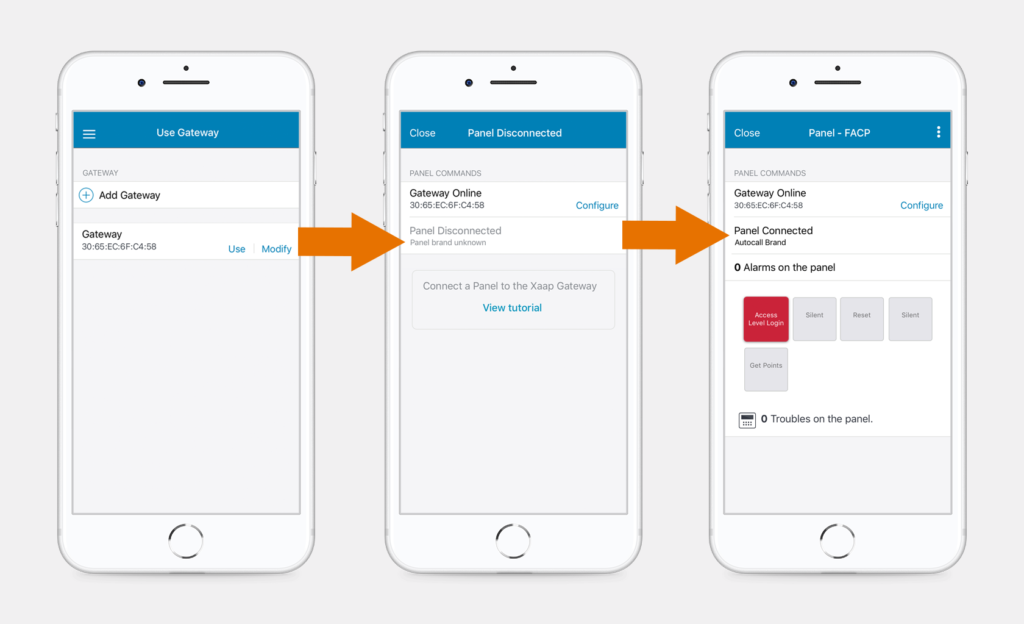
Once the gateway is connected to both the panel and the cloud, you are ready to start your inspection!
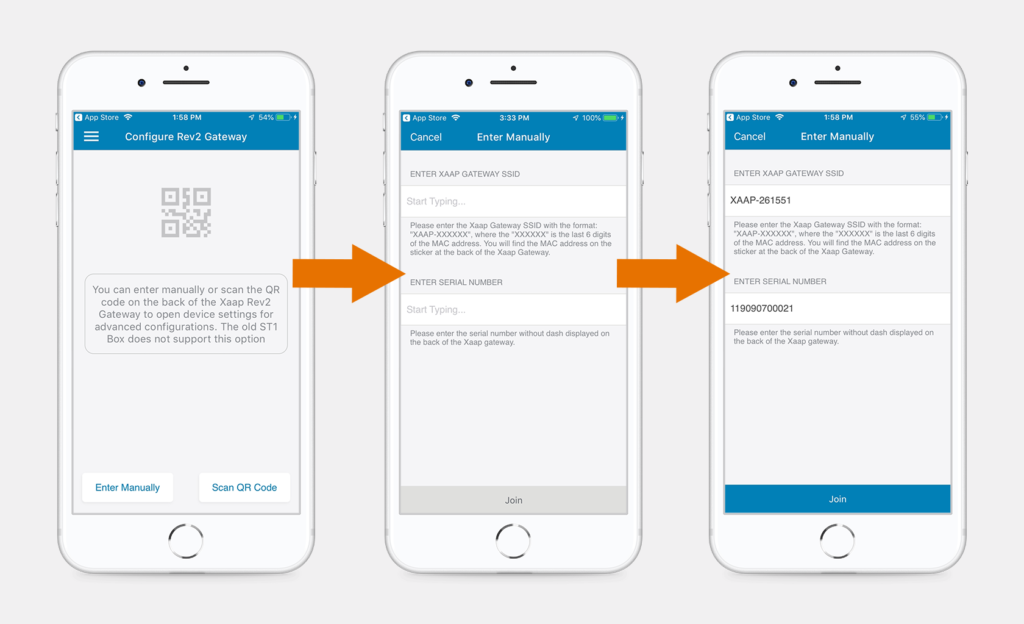
Connecting to the Gateway Manually
To connect the gateway manually, you need to enter two things:
- The Xaap Gateway SSID
- The Xaap Gateway serial number
Both of these should be clearly displayed on a label on the gateway itself and/or in accompanying documentation. The SSID is in the format ‘XAAP-xxxxxx’ where ‘xxxxxx’ is a six character alphanumeric string. These six characters are the last six characters of the MAC address of the gateway. The serial number is 12 digits long.
Once you enter these values into the appropriate fields, the ‘Join’ button at the bottom of the screen should become active. Click this to proceed.
Note, that the values you enter will be remembered by the application and you will only have to type them in once for a particular gateway. On subsequent use, they will appear pre-filled in this screen. If at any point you wish to use a different gateway, you can simply edit the values you have entered here.
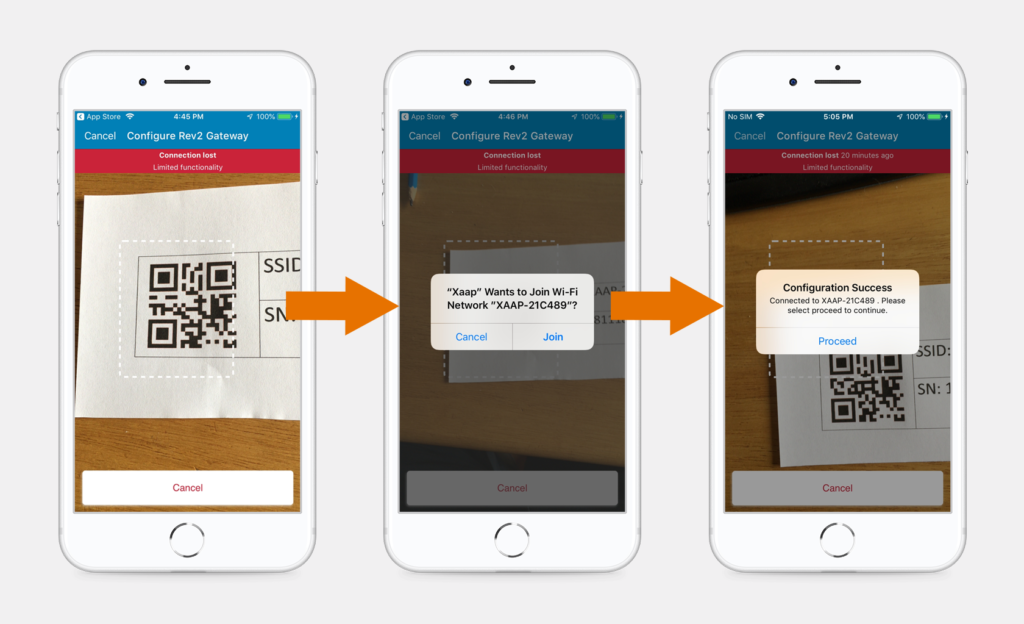
Connecting to the Gateway using a QR Code
Alternatively, you can connect by using a QR code, which is displayed either on the gateway itself or in accompanying documentation.
- Click on ‘Scan QR Code’ and move the dotted rectangle over the QR code of the gateway.
If it scans successfully, you will see a pop-up message indicating that the app wants to join the Wi-Fi of that gateway. In order to configure the gateway, your phone connects temporarily to its Wi-Fi access point. Note that, while you are joined to it, you will lose your Wi-Fi connectivity to whichever network you are currently connected to (note the red ‘Connection lost’ banner). This will be restored once you exit the configuration application.
- Click ‘Join’. If it joins successfully, you will see another pop-up indicating this fact.
- Click ‘Proceed’.
The Gateway Configuration Application
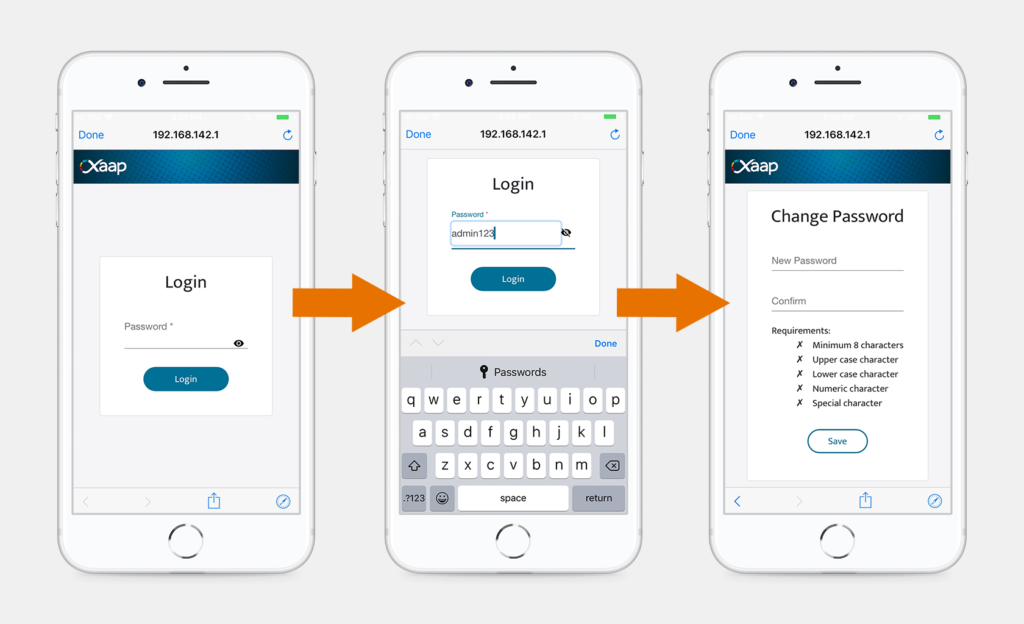
1. Login
You are now presented with the login page of the gateway configuration application. If this is the first time you have used the gateway or you have done a factory reset, you initially login with the default password ‘admin123’. You will immediately be presented with a screen to configure a more secure password. The requirements for this password are shown on the screen.
2. Getting Started Pages
You are now presented with the Welcome screen of the gateway configuration application. At this point you can select which type of fire panel you are connecting to. Click on ‘Change’ and select the appropriate panel type. Then, click ‘Next’.
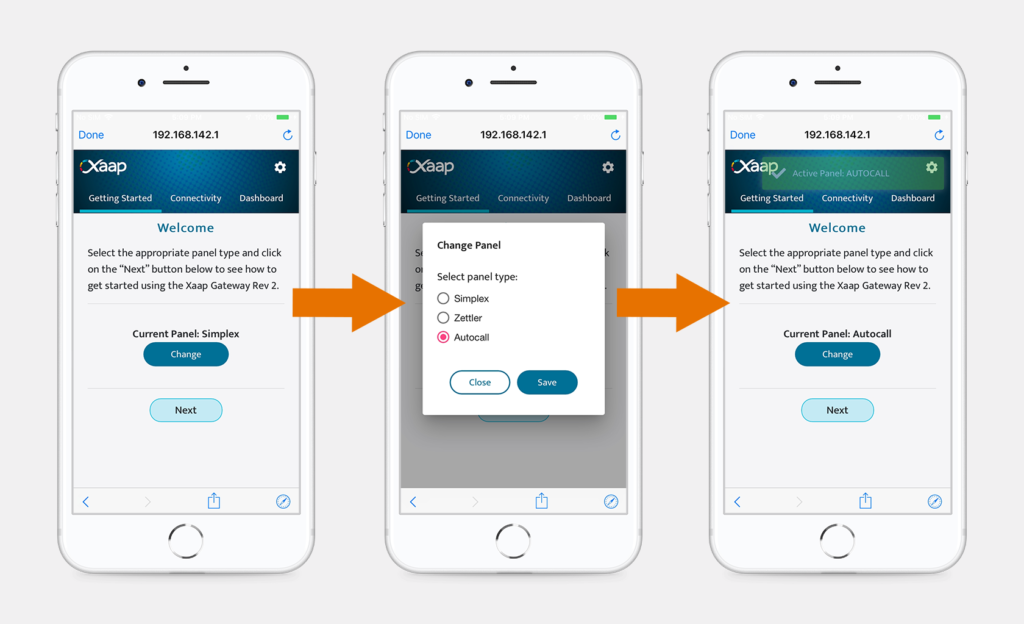
The next page provides details on how to connect the gateway to the specific fire panel type you have selected. Clicking ‘Next’ (at the bottom of the screen) or clicking on ‘Connectivity’ (at the top of the screen) brings you to the connectivity configuration screens.
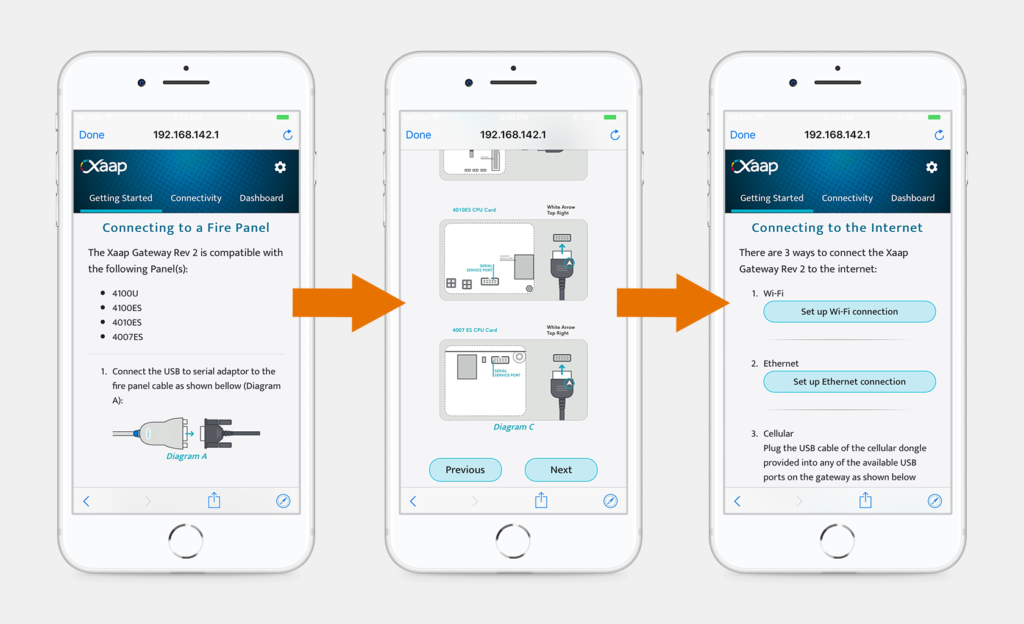
3. Connecting to the Xaap Cloud
The gateway offers three options to connect to the Xaap cloud via the Internet:
- Wi-Fi
- Ethernet
- Cellular
Connecting To The Xaap Cloud via Wi-Fi
Assuming Wi-Fi networks are available, you will see a list of them on the Wi-Fi screen. Tap on the Wi-Fi network name to which you want to connect. You will be prompted to enter the Wi-Fi password if it requires one, which is normally the case. Enter the password and click ‘Connect’. If the connection succeeds, the network will be listed under ‘Connected To’.

Tapping on the info icon brings up a pop-up which allows you to either forget this network or disconnect from it.
If you click on ‘Forget this network’, the gateway disconnects from it and forgets the password you have entered.
If you click on ‘Disconnect from this network’, the gateway disconnects from it but retains the password. The network will be listed as ‘Saved’ in the list of available networks. If you then click on the network again, it will reconnect without requesting the password. Note, that it will also reconnect automatically if you restart the gateway by plugging out and in the power cable. This means that if you return to a building where you have previously used the gateway and Wi-Fi, it should reconnect on start-up without the need for configuration.
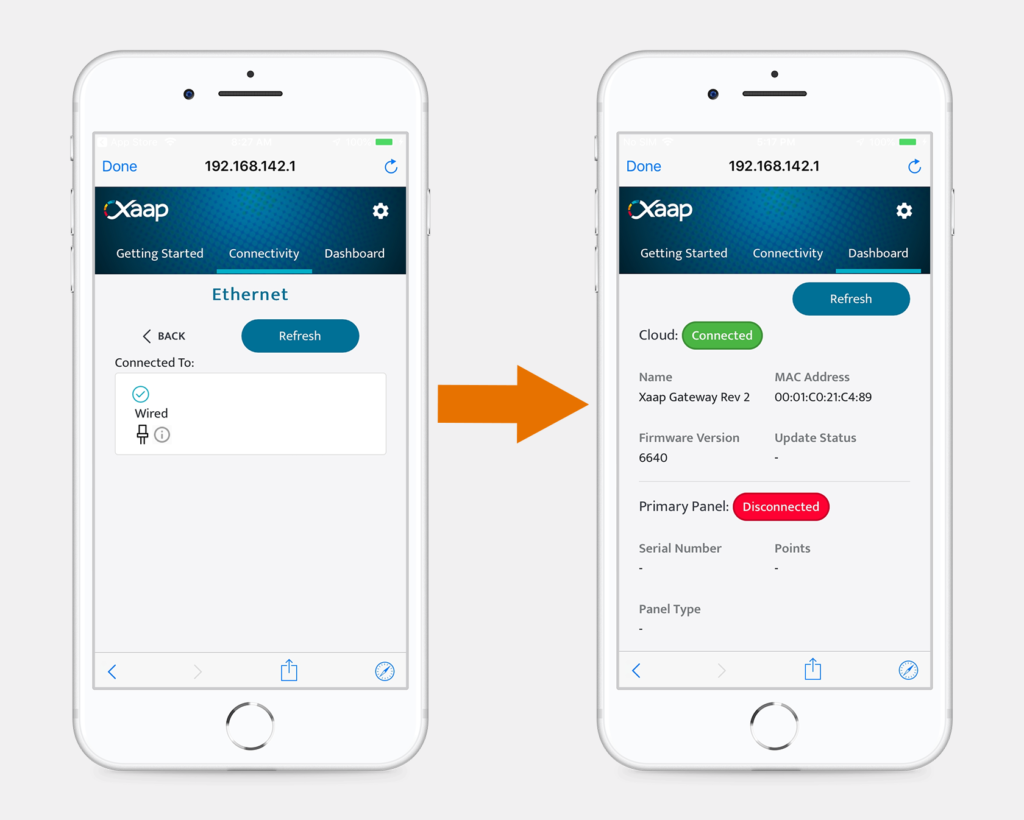
Connecting To The Xaap Cloud via Ethernet
Select ‘Set Up Ethernet Connection’ from the ‘Connecting To The Internet’ screen. No specific configuration is required on the gateway to enable an Ethernet connection. Simply plug one end of the Ethernet cable into the port on the back of the gateway (as pictured here) and the other into the available port in the building. If the physical network is successfully connected, you will see a confirmation that you are connected to a Wired Ethernet network. Then, go to the Dashboard page to check whether the link has been established to the Xaap cloud.
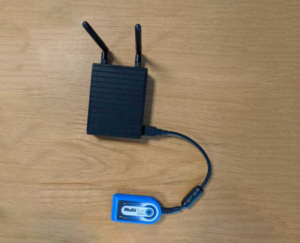
Connecting To The Xaap Cloud via Cellular Connection
To connect to the Xaap cloud using a cellular network, plug your modem into one of the USB ports, as shown below:
The Gateway Dashboard
The gateway dashboard is split into two parts. The top part of the page provides information about the gateway itself and its connection to the Xaap cloud. The bottom part of the page provides information about the connection to the fire panel.
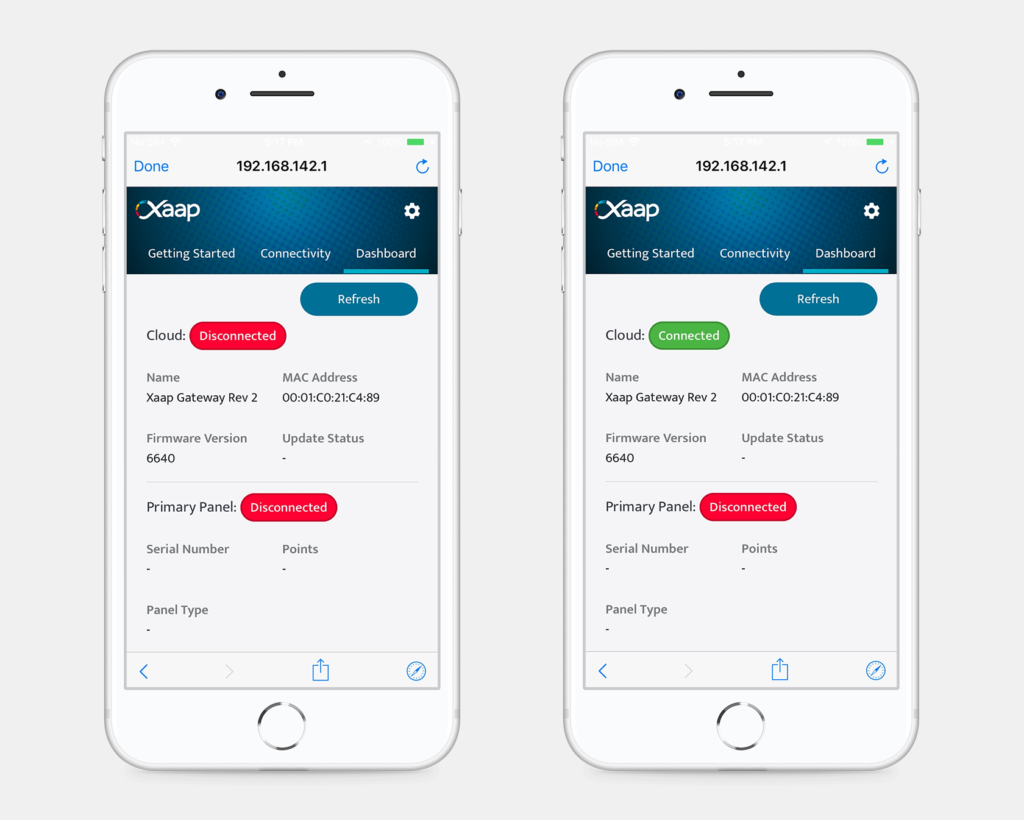
Cloud Status
Cloud Connection Status: Connected or DisconnectedThis is used to indicate whether the gateway has established a connection to the Xaap cloud. Once you have selected the connectivity option that you wish to use and have confirmed that it is functioning (see Connectivity Options), you use this indicator to check whether the Xaap cloud connection itself has been established. If it has not, it may be that the connectivity option you have chosen is blocking the Xaap cloud connection for some reason. For example, some public Wi-Fi networks only allow certain types of internet traffic for security. See the trouble shooting section for some suggestions on how to solve or work around such issues.
Name: name of the gateway, used to identify which type of gateway you have
MAC Address: MAC address of the gateway, which should also appear on labels on the gateway itself, as well as in user documentation. A portion of the MAC address is used in the SSID of the gateway (see Connecting to the Gateway Manually).
Firmware Version: The version of firmware currently running on the gateway. This should be provided if you are reporting any issues with the gateway.
Update Status: Downloading, Download Succeeded, Download Failed, Installing, Install Succeeded, Install Failed, Download Info Error, No Update
This shows the firmware upgrade status. The gateway upgrades its firmware automatically when a link is established with the Xaap cloud. The upgrade is a two stage process. In the first stage, the gateway downloads the new version of firmware and prepares it for upgrade. This happens in the background. If you are using the gateway in an inspection, it will not be affected. The update status will indicate the progress of the download. The second stage of the upgrade occurs when you next restart the gateway. The downloaded firmware is installed and the gateway attempts to run it. If it succeeds, you will see a new firmware version in the Firmware Version field. Otherwise, it will revert back to the previous version.
Panel Status
This is used to indicate whether the gateway has established a connection with the primary fire panel or not. The ‘primary’ fire panel is the panel the gateway is physically connected to, using the serial cable. In networked fire panel systems, this may give access to other fire panels and their connected devices, but the connection status relates only to the primary panel.
Serial Number: Serial number of the fire panel, if it is available. If the panel doesn’t provide a serial number, or the connection with the panel has not been established, this field will be blank.
Panel Type: Brand of fire panel connected (please note that this field is currently not reliable. However, it is intended that it shows what brand and model of fire panel is connected where possible.)
Points: Get Points In Progress or Get Points Done
A key feature of the Xaap gateway is its ability to automatically or on demand download the inventory of devices or points that need to be inspected from the fire panel. This mechanism is referred to as ‘get points’. This field shows the progress of the download. In large systems, the download of the points can take several minutes. The Xaap mobile application also provides updates on its progress.
If automatic get points is enabled (initial default), the get points happens as soon as you connect the gateway successfully to a fire panel. Depending on the timing, the get points may already have happened by the time you view the status page and you will see ‘Get Points Done’ in this field. If not, you will see ‘Get Points In Progress’ followed by ‘Get Points Done’.